
TRACES tutorial · Manual submission
How do you submit an EUDR DDS in TRACES?
Start with the responsible operator, add the goods and their production locations, save a draft, then review the declaration before submitting. After submission, check the statement’s status and retrieve its reference number when the system issues it.
This walkthrough follows a fictional wood example through the EUDR Information System’s acceptance environment. It is for an operator preparing a Due Diligence Statement (DDS), not a simplified declaration (SD). Confirm which obligations apply to your business before choosing the form.
Before you open the form
Have the operator’s details, product description, classification, quantity, species information where applicable, and production locations ready. The DDS preparation worksheet helps organise these fields. It is a working document, not a file you upload to submit the statement.
You also need the evidence and conclusion supporting your due diligence assessment. Completing the form does not perform that assessment for you.
Use the Commission’s Information System page for official production and acceptance links. EU Login and access to the legal entity must be set up first; registration and system access are separate from this submission walkthrough.
The fictional example we used
Majumder Consultancy is a fictional operator registered in acceptance. For this exercise, it first places French-grown maritime pine logs on the EU market in the Netherlands. The product and plot values follow our worksheet example; the test account’s operator details differ.
- Activity
Domestic; country of activity Netherlands
- Internal reference
TUTORIAL-FICTIONAL-20260906
- Product
Maritime pine logs, lot EXAMPLE-WOOD-01; heading 4403
- Species and quantity
Pinus pinaster; Maritime pine; 1,000 kg net mass; 0% estimated deviation for this fictional example
- Production
France; Example Forest Producer (fictional); EXAMPLE-PLOT-01
- Plot
2 hectares; longitude −0.900000, latitude 44.500000
These are synthetic tutorial values, not evidence about a real forest, shipment or supplier. Use your actual classification, measurements and verified locations for real goods.
1. Create a statement as the correct operator
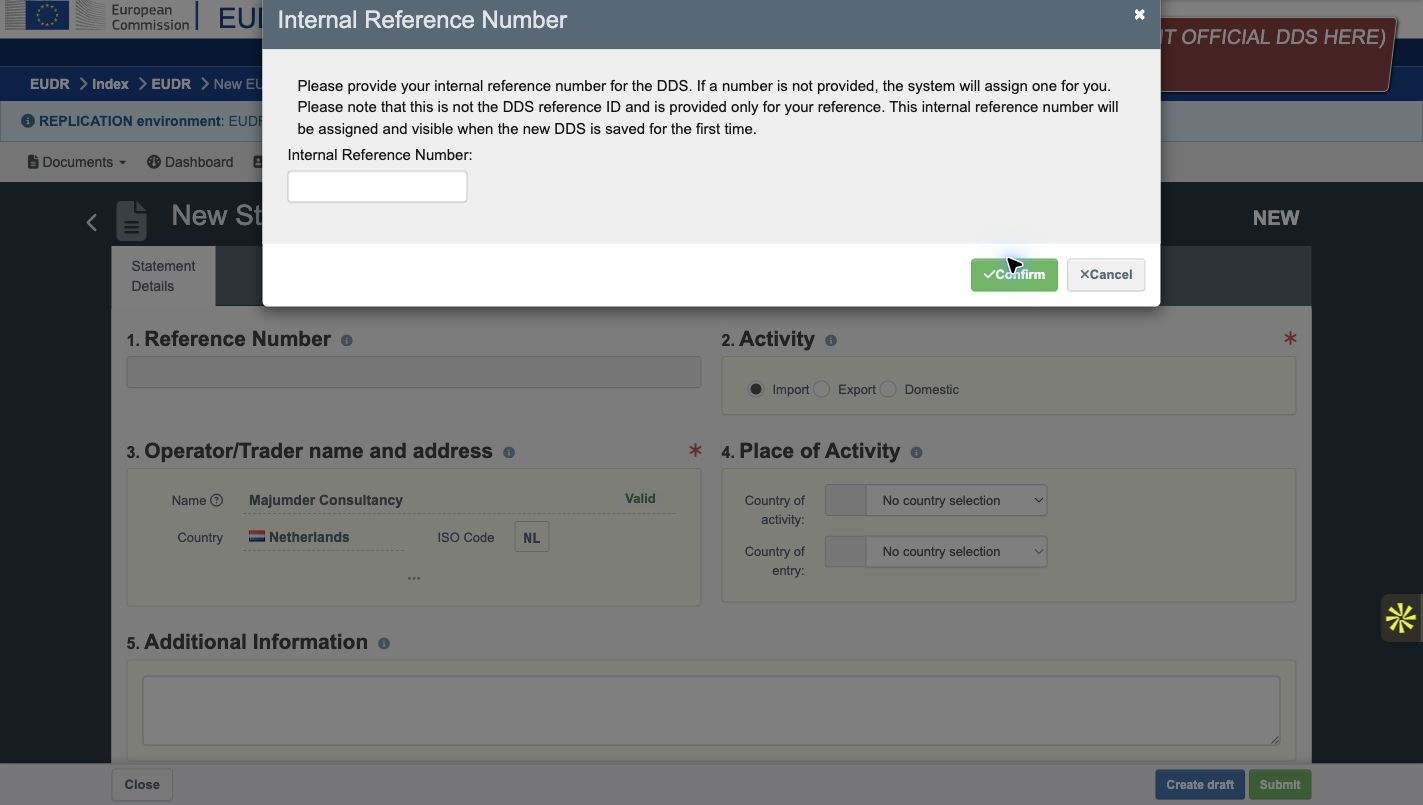 1Your internal identifier, not the system-issued DDS reference.InvariTech annotations · Select image to open the unmarked original.
On the acceptance dashboard, open Create a new EUDR Statement and choose As Operator for this example. The menu also offers representative routes. Choose a route that reflects your authority; preparing a statement for another entity is not the same as acting as that entity.
The new form opens an optional Internal Reference Number prompt. Enter an identifier you can reconcile with your records, then confirm. In our test, it appeared in the statement title after the first save. It is not the DDS reference number issued by the system.
2. Check activity, operator and place of activity
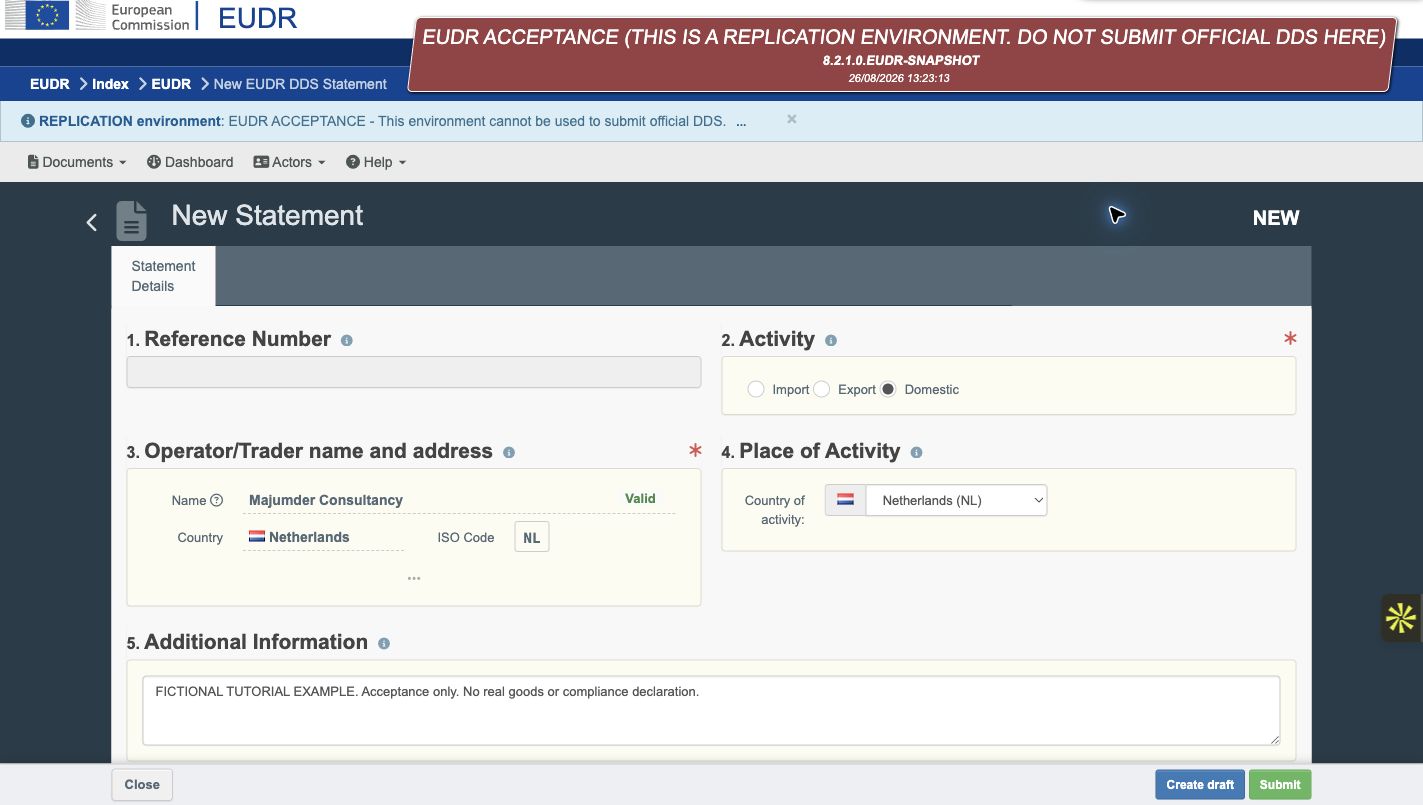 1Domestic is the activity selected for this example.2Country of activity; production country is entered separately.InvariTech annotations · Select image to open the unmarked original.
The form initially selected Import. We changed it to Domestic, checked the fictional operator’s name and country, and selected Netherlands as the country of activity. Do not keep the default simply because it is already selected.
The country of activity and country of production answer different questions. Our goods are first placed on the market in the Netherlands, but the wood was grown in France. The import form displayed a country-of-entry field; that field disappeared when we selected Domestic.
In Additional Information, we labelled this record as a fictional acceptance-only tutorial. This label is for the exercise, not a replacement for any required statement fields.
3. Add the product and quantity
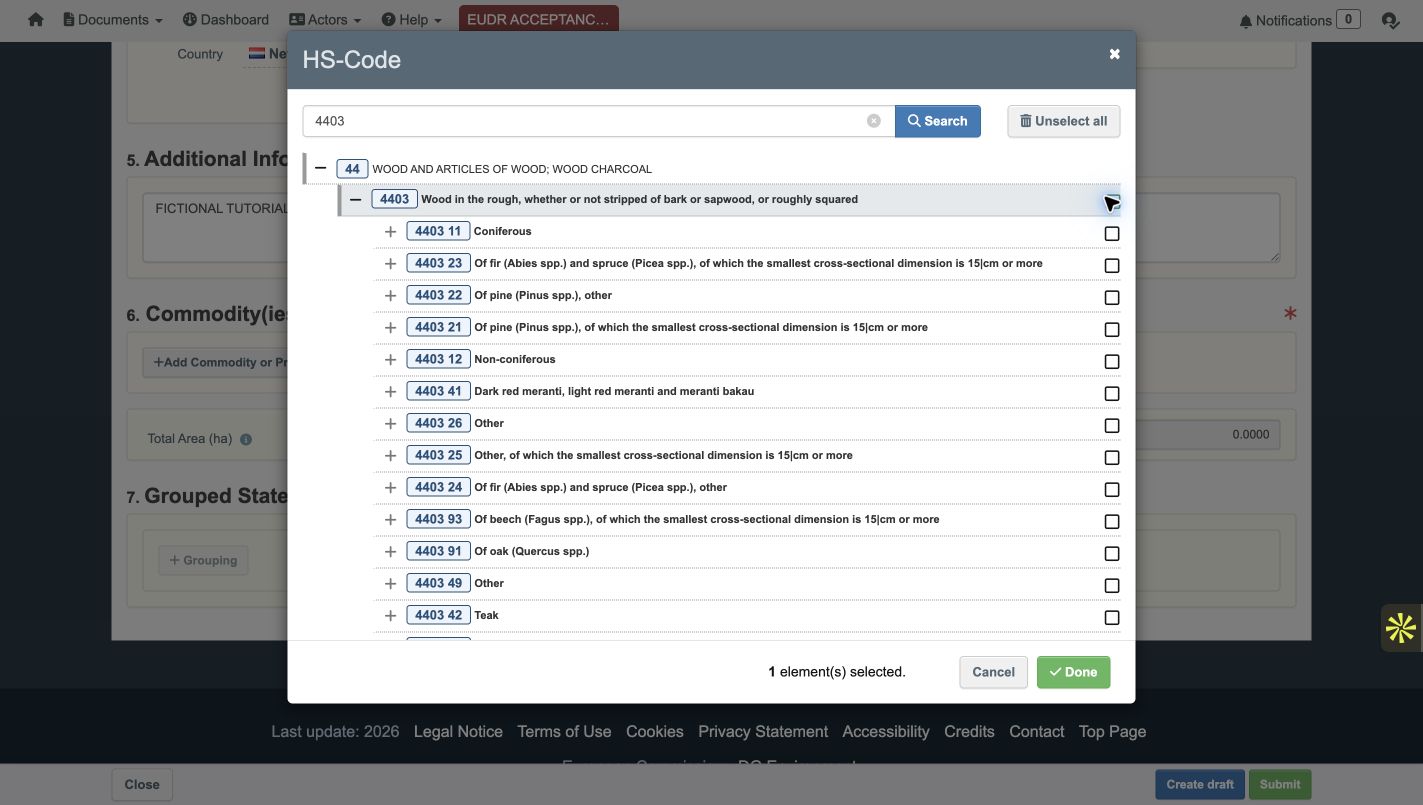 1Selected 4403 heading. Use the code appropriate to your goods.InvariTech annotations · Select image to open the unmarked original.
Under Commodity(ies) or Product(s), select Add Commodity or Product. Search for 4403, select the checkbox for wood in the rough, and choose Done. The tested interface allowed the heading itself to be selected and also displayed more detailed codes beneath it. Confirm the classification of your actual product rather than copying ours.
Enter a description that identifies the goods and lot, then the net mass and applicable quantity details. We entered 1,000 kg and 0% estimated deviation. For the species, type Pinus pinaster, select the matching catalogue result and enter Maritime pine as the common name.
4. Enter the production location
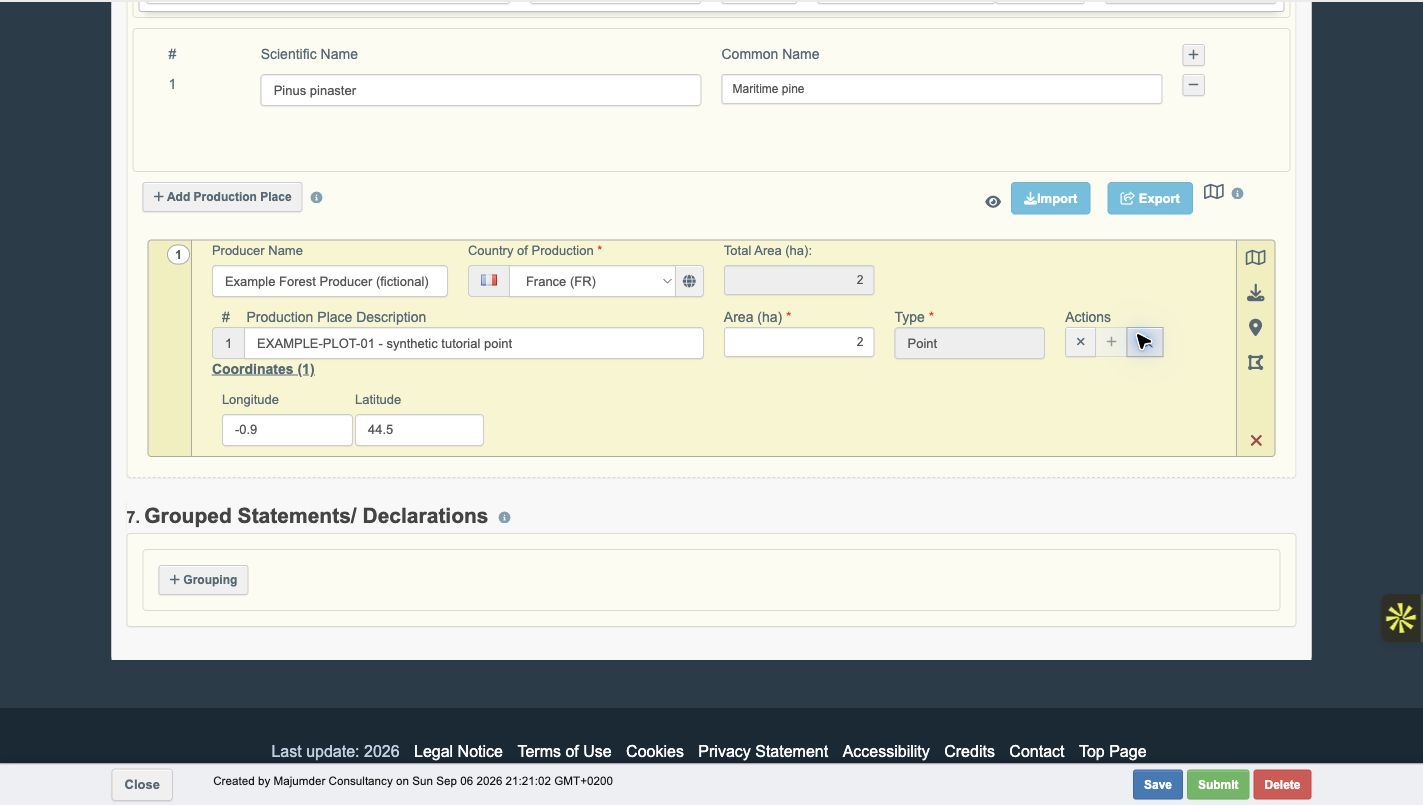 1Plot area in hectares: 2 in this fictional example.2Longitude first (−0.9), then latitude (44.5).InvariTech annotations · Select image to open the unmarked original.
Choose Add Production Place, enter the producer name and select France as the country of production. Use the point-pin control to add a point. Give the plot a description, enter its area, and open the eye control to view its coordinate fields.
In our test, the new point started at 4 hectares and coordinates 0,0. We replaced those defaults with 2 hectares, longitude −0.900000 and latitude 44.500000. Check the field labels: longitude and latitude must not be swapped.
This small wood plot illustrates point entry. Use the point-versus-polygon requirements for your own plots. For bulk location data, the interface provides an import control and the Commission documents GeoJSON support. You can check a GeoJSON file and inspect its locations on a map before import; passing those checks does not establish legal compliance.
5. Save and review the draft
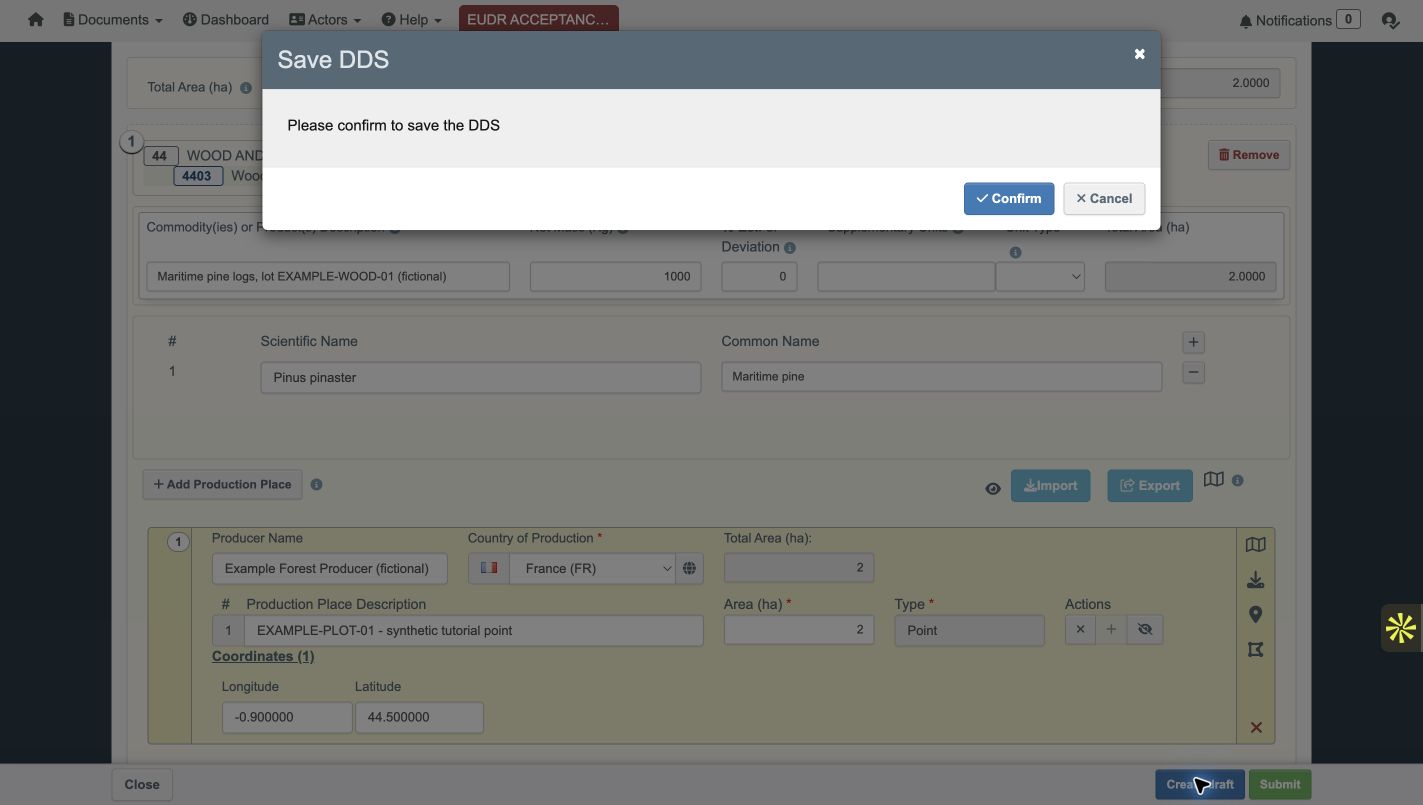
Choose Create draft, then confirm the Save DDS prompt. Our statement reopened with DRAFT status and the internal reference in its title. Its product, species, quantity and production-place details were retained.
Review the saved record against your source information. Check the operator, activity, goods, quantities, all relevant production plots and the due diligence conclusion. A saved draft is not a submitted statement.
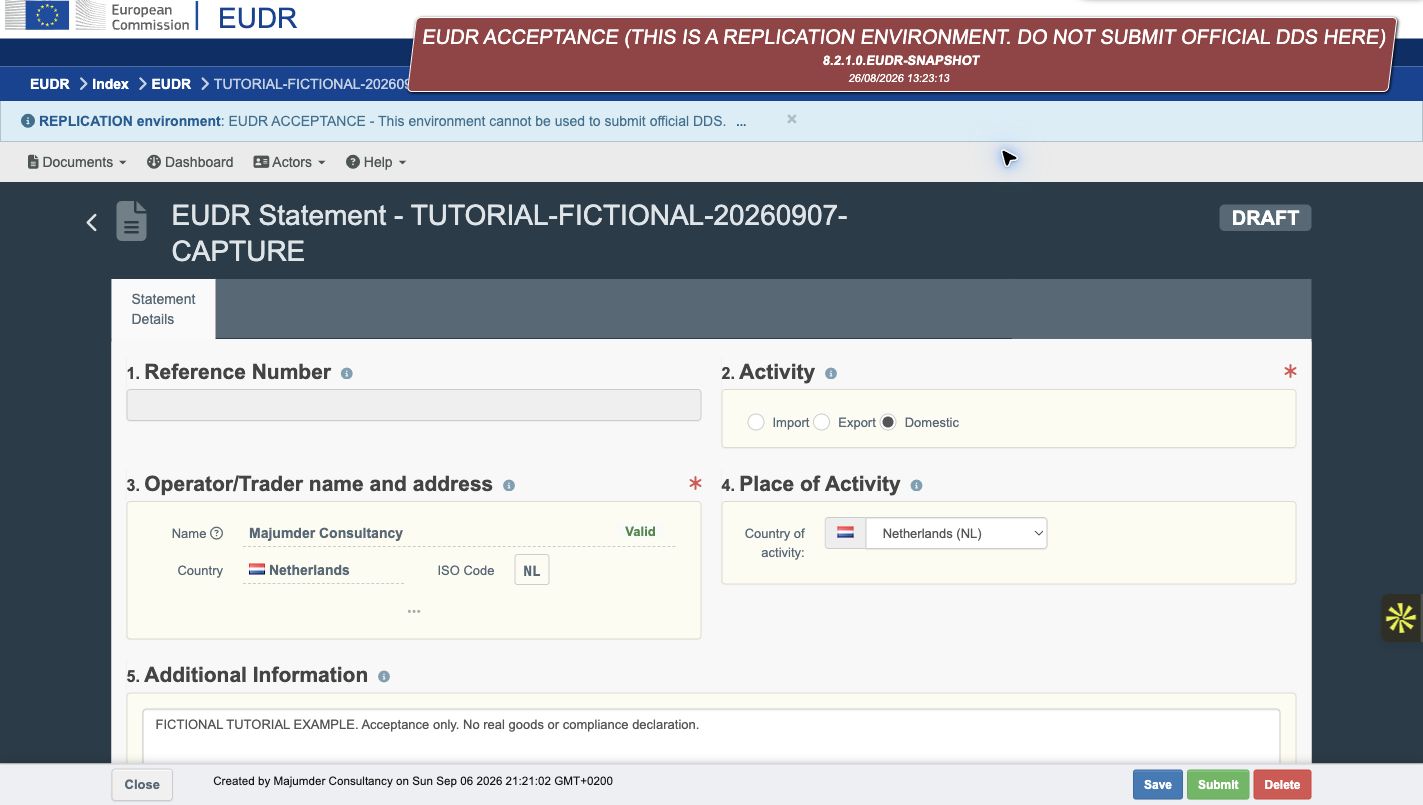 1DRAFT means saved, not submitted.InvariTech annotations · Select image to open the unmarked original.
6. Review the confirmation and submit
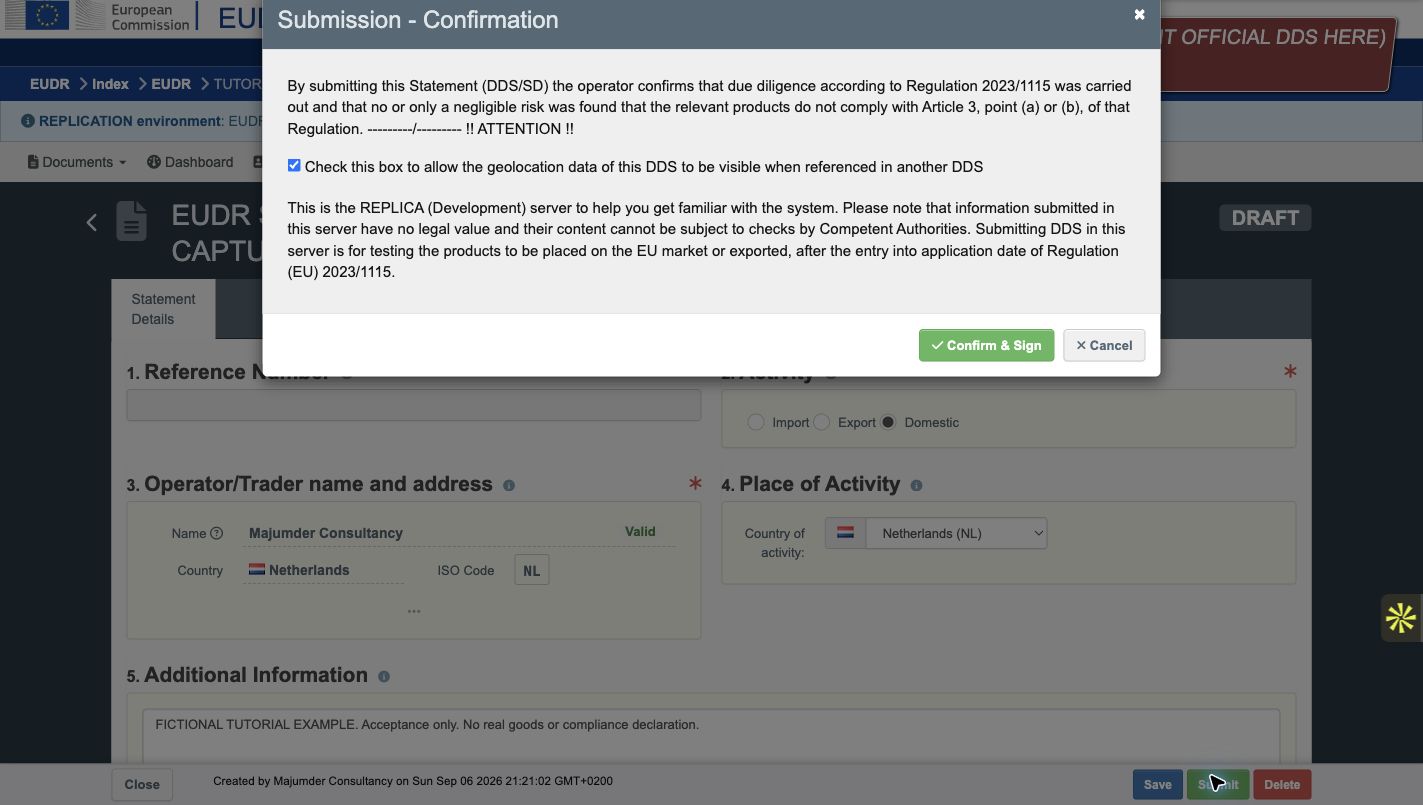 1Review the geolocation-sharing choice before signing.2Confirm & Sign is the submission action, not Save draft.InvariTech annotations · Select image to open the unmarked original.
Choose Submit to open the confirmation. Read the declaration before selecting Confirm & Sign. In production, this is the operator’s confirmation about the due diligence carried out and the risk conclusion, not merely a technical form check.
Our confirmation also displayed a checked geolocation-visibility option for when another DDS references this statement. Review that choice deliberately instead of overlooking it. The acceptance dialog explicitly stated that submissions there have no legal value.
We confirmed the fictional acceptance statement and received a success message. After dismissing it, the record showed SUBMITTED.
7. Check the outcome and retain the right identifiers
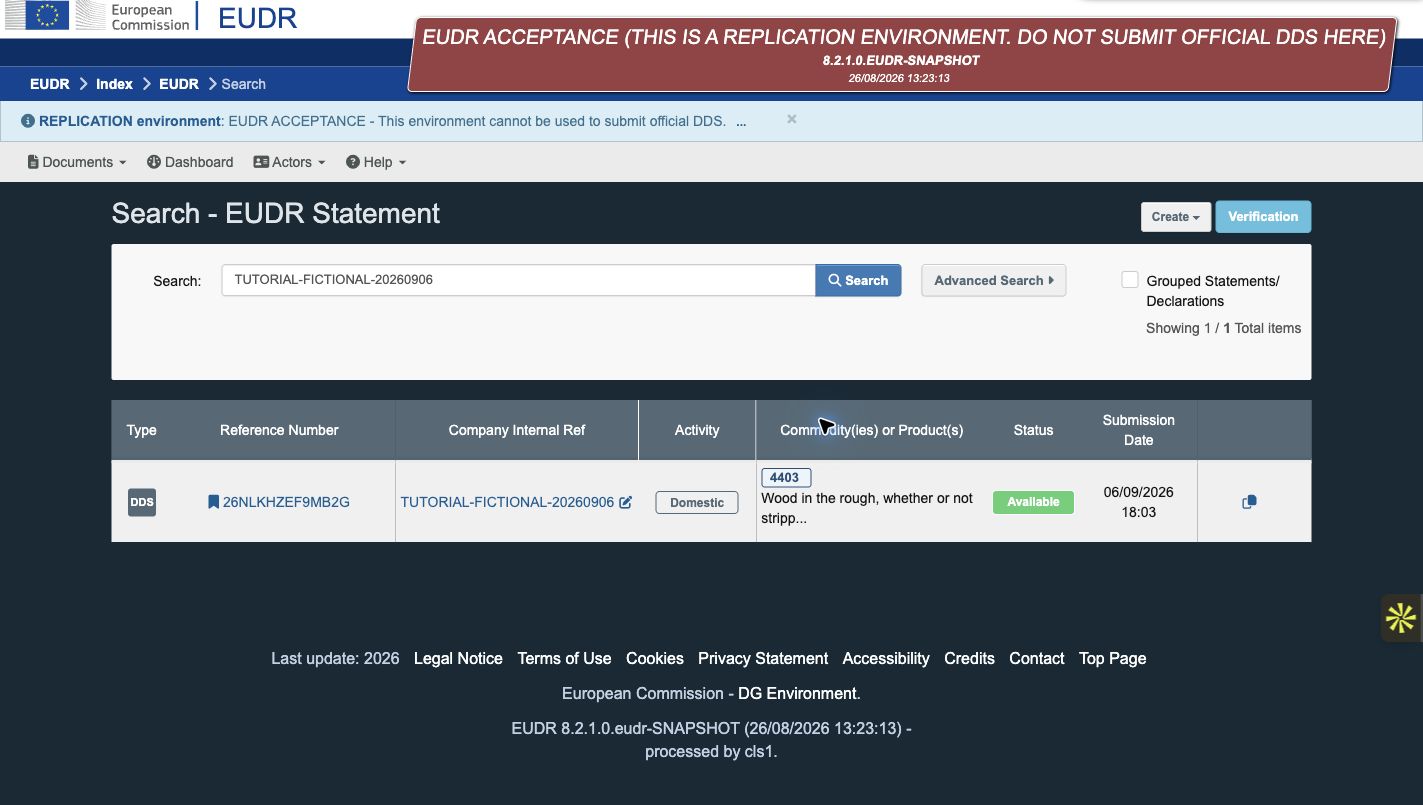 1System-issued DDS reference.2Company internal reference: a different identifier.3Available status after processing.InvariTech annotations · Select image to open the unmarked original.
The success message said that the corresponding reference number would become available later and directed us to check the dashboard. Do not treat the internal reference or a SUBMITTED status as the issued DDS reference number.
Return to the dashboard and inspect the same statement as processing continues. Once issued, retain the DDS reference and verification numbers with the correct goods and environment. Keep verification details in controlled records, not public screenshots.
In the tested interface, we chose Go to the EUDR main Search Page from the dashboard and searched for our internal reference. The matching row subsequently showed Available and an issued reference number. This is an observed outcome for our test, not a guaranteed processing time or an authority’s approval of the goods.
If the page times out, check whether the statement already exists before submitting again. An interrupted screen is not enough to conclude that the server rejected a submission.
What does a grouped statement look like?
This separate acceptance example shows a cocoa statement labelled Available – GROUP HEAD. It is not the wood DDS from the walkthrough above. The head has its own reference number; the form’s Grouped Statements/Declarations section lists the linked statement reference and activity.
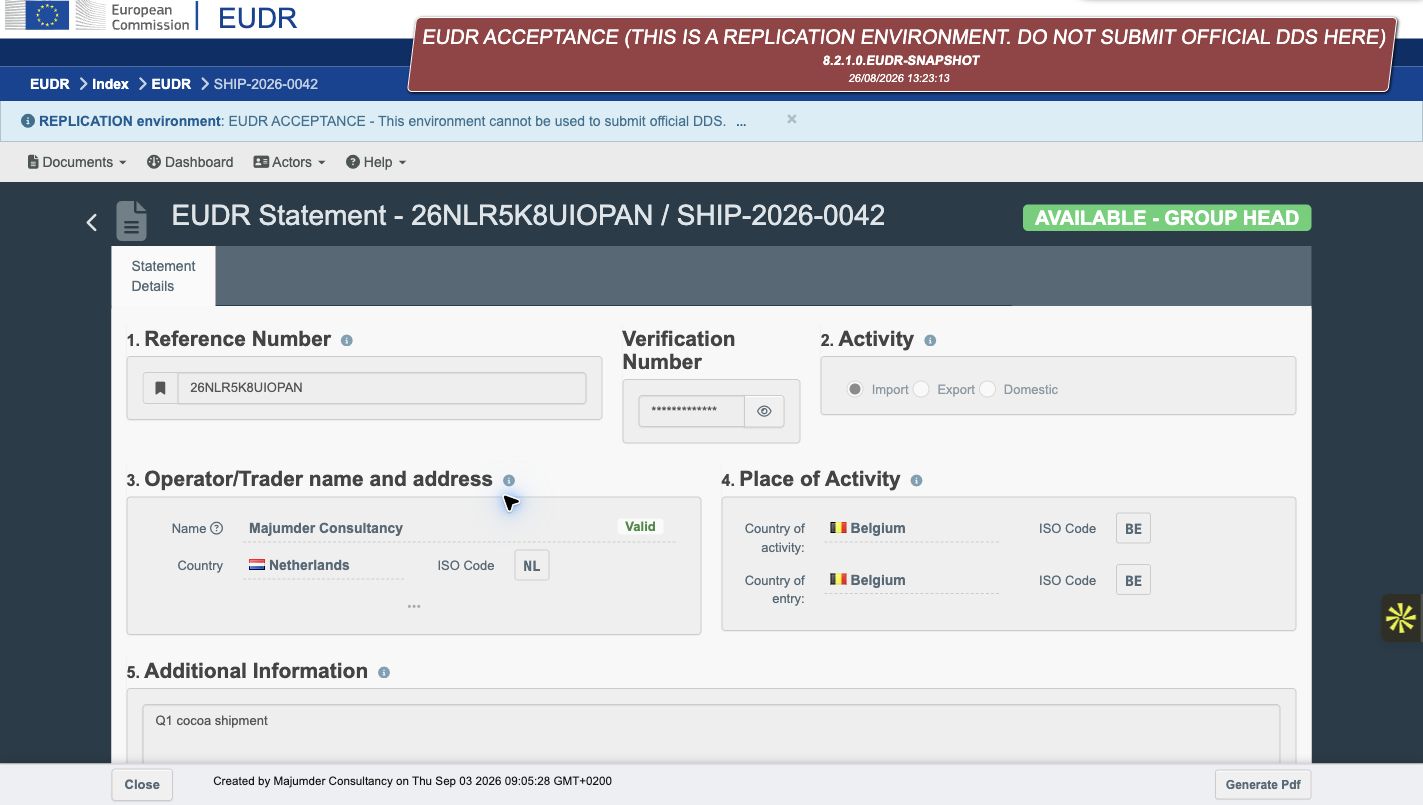 1GROUP HEAD identifies this record as the group head.InvariTech annotations · Select image to open the unmarked original.
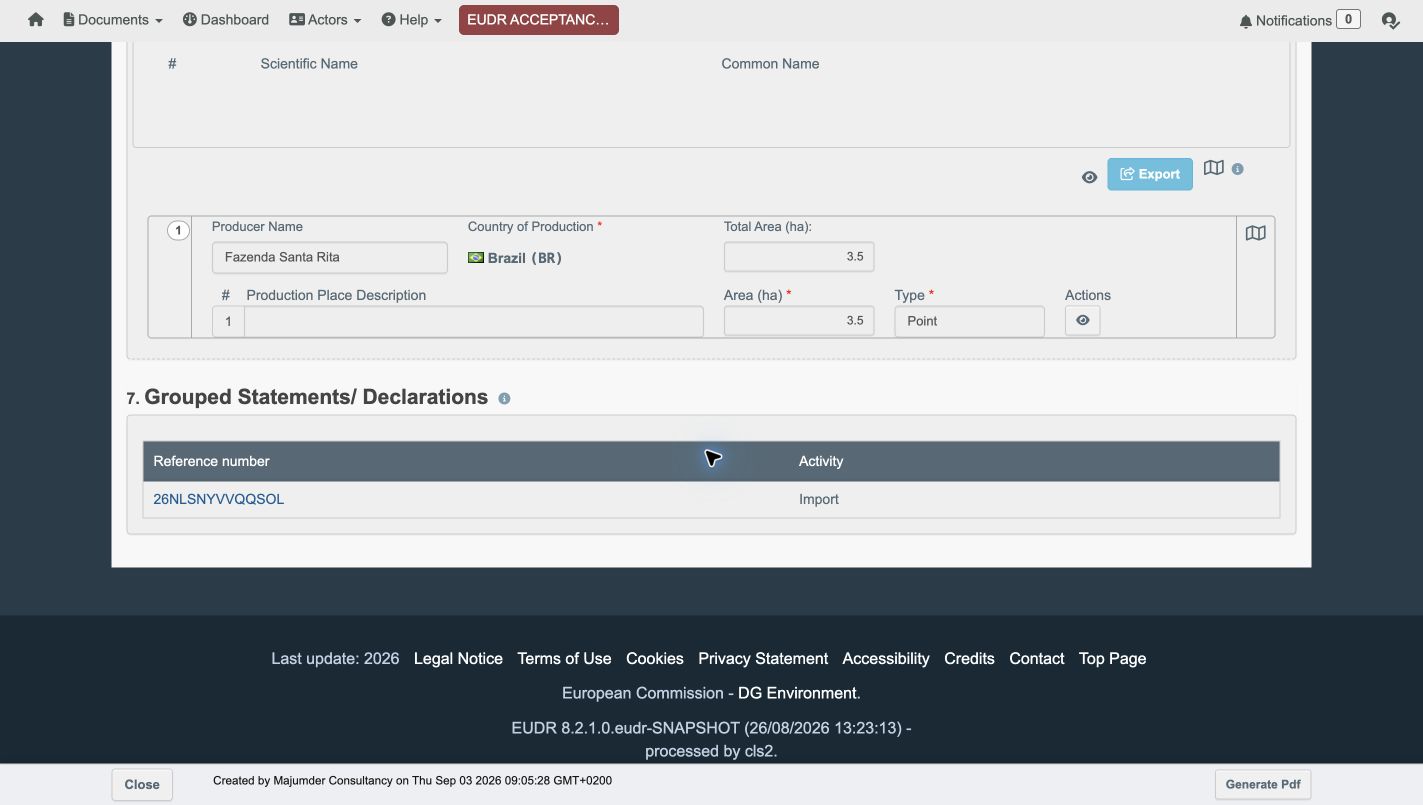 1Linked member reference within Grouped Statements/Declarations.InvariTech annotations · Select image to open the unmarked original.
Check the linked records as well as the head when reconciling a group. These screenshots are interface examples, not evidence that any set of shipments may be grouped or that the underlying goods comply.
Repeating this process across many statements?
If your team repeatedly copies product data, checks supplier files and retrieves reference numbers, share that workflow with us. A scoped EUDR implementation can connect validation, exception handling and submission records to your existing systems. Our EUDR submission infrastructure case study shows the kind of integration work involved.
Discuss your DDS workflowInterface walkthrough verified in acceptance on 6–7 September 2026. Refer to the Commission’s current system guidance and training for updates. This tutorial is operational guidance, not legal advice or evidence that a product complies.